PCF: To directly email a screenshot from a Canvas App
- Ritika Agarwal
- May 18, 2020
- 3 min read
In this blog post, I will walk through the steps to implement a PCF to send the screenshot of the canvas app screen through an email. This PCF can be used to generate the base64 image data for the current screen and that can be further used to send as an email attachment or store in SharePoint etc.
Problem Statement
There could be cases where a calculation is performed in the app and based on the data input, an acknowledgement needs to be sent to the relevant stakeholders. So how to take a screenshot of the app screen directly and send it as an email attachment with minimal steps involved in the entire process?
Solution
Right now if we want to share a screenshot of the screen from a canvas app, we first need a tool to capture the screenshot, save it and then send that as an attachment via email. A PCF to generate image data can be used to capture the image and send it as an email attachment. Lets take a look at how the "Screenshot" PCF can be used and implemented in a canvas app.
Step 1: Steps to import PCF from the GitHub repository.
You can download the managed solution from the GitHub repository and import it directly in your environment.
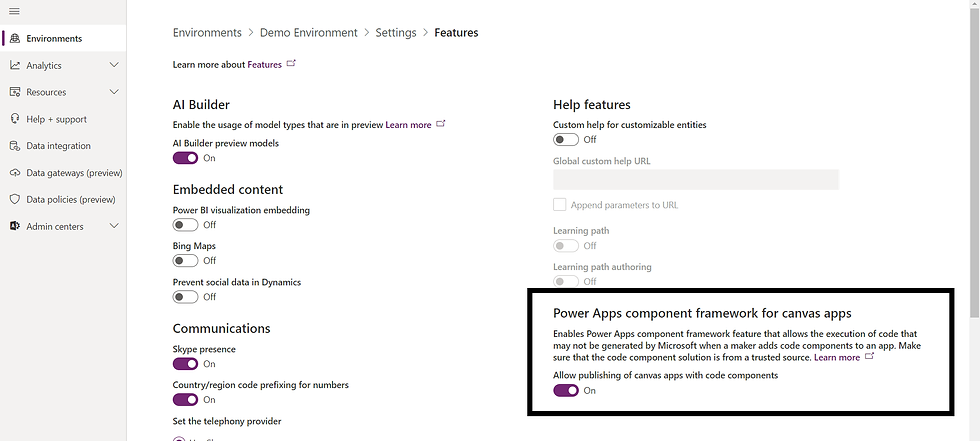
Step 2: Enable PowerApps Component Framework for Canvas Apps in your environment to be able to publish the app.
a. Navigate to "Admin Center" and select the Environment. Select "Settings" from the top navigation bar

b. Expand Products and select Features.
c. Enable Power Apps Components for Canvas Apps

Step 3: Add component to the screen.
a. Select Insert tab from the Top Menu and select Custom and then select Import Components.
b. Select the component you want to import in the app.

c. Select the component from the Code Components section and it will be added to the screen.

Step 4: Select Users via Combobox Control
Add a combobox control and configure the "Items" property as:
Expression: Office365Users.SearchUser()
Explanation: The expression retrieves all the users from the Office 365 Directory. We will extract the email ids to send the email once the screenshot is captured.
Step 4: Custom Component Configuration
The custom component has a set of properties that can be modified to make the component mix-up with the look and feel of the existing configuration on the screen in canvas app.
OnChange: ClearCollect(ImageCollection,{Name: "CapturedScreen.jpg", ContentBytes: 'btd_btd.screenshot(00000001-0000-0000-0001-00000000009b)1'.OutPut, '@odata.type':""}); Office365Outlook.SendEmailV2(Concat(ComboBox1_1.SelectedItems,Mail,";"),"Screenshot from Canvas App","Attached is the screenshot from the canvas app screen.",{Attachments: ImageCollection})
Explanation: OnChange gets triggered when the button is clicked in this case. It will collect the image in a collection and send that as an attachment to email.
ImageCollection -> Collection to store the captured image returned from the custom component in a valid format to be recognized as an attachment.
'btd_btd.screenshot(00000001-0000-0000-0001-00000000009b)1'.OutPut -> This is the output property of the custom control that returns base64 string.
Concat(ComboBox1_1.SelectedItems,Mail,";") -> Returns a concatenated string of all the selected user's email separated by semi-colon(;).
PCF Properties:
Input
ButtonText - The text that will be displayed on the button placed on the screen.
ButtonHeight - Defines the height of the button that gets rendered on the screen.
TextColor - Color of the text that will be displayed on the button placed on the screen.
TextSize - Defines the height of the button text
Font - Defines the font of button text.
BackgroundColor - Background color of the button placed on the screen.
Output
OutPut - Returns the Base64 string for the captured image.
Setup in Action
This PCF control control uses a npm library "html2canvas", which has been referenced here. This is helpful for folks who want to send the data recorded on the screen of a canvas app as a screenshot. This PCF will overcome the process of manual intervention, using flows or multiple actions to send screenshots from Power Apps screens.
I hope this was useful for you. In case of any questions or suggestions, feel free to reach me out on twitter at @agarwal_ritika
Comments